How to Install A Glueless Wig? Step by Step
Wigs have turned the hair game around. You can change your style, preserve your natural hair, or just save time in the hectic mornings, and wigs can achieve all this. There are several varieties, but glueless wigs have become very popular due to their convenience and comfort.
In contrast to old-fashioned wigs, which attach the wig with the help of glue or adhesives, glueless wigs are equipped with adjustable straps, combs, or elastic bands that help to fix the wig on your head. It implies that you achieve a natural appearance with no untidy products and the danger of fraying your edges.
You won’t have to go out to get someone to fit a glueless lace wig; in this guide, we will take you through the process at home. In the end, you will be confident in doing it on your own and have a natural, perfect look.
Why Choose A Glueless Wig?
Before getting down to the steps, it is best to briefly discuss why these wigs are so popular.
- Installation-free – simple to install.
- Protective to your hairline – keeps your edges healthy.
- User-friendliness – ideal when you are new to the wigs.
- Breathable and comfortable – you can wear it day long and not be irritated.
- Reusable – fast to wear and to remove at any time.
Now, we can move directly on to the installation process.
Step 1: Prep Your Natural Hair
1)Braid Or Slick It Down
Your wig install begins with your own hair. In case you have longer hair, you should braid it down and make it in cornrows or flat twists. If your hair is short, you can put it back in place using some gel or mousse.
The idea is to have your hair tucked in as much as possible to enable your wig to be laid flat and seem like it is part of your hair.
2)Protect With A Wig Cap
Wig cap. – When you have curled or greased your hair, wear it. Not only does it keep your hair in place, but it keeps it out of the way. Select one that fits your scalp shade so that the lace fits more seamlessly.
Step 2: Prep The Wig
1)Adjust The Wig Size
The human hair glueless wigs are usually associated with straps and combs that can be adjusted. Snug it but not so tight: Before it is put on, loosen or tighten the straps until the cap fits snugly, but not overly tight.
2)Cut The Lace (If needed)
When your wig is a lace wig, you will have to cut out the excess. Put the wig on your head, make a mark at where your hairline starts and trim the lace in little bits. Always leave some small piece of lace to give a natural effect in the hairline.
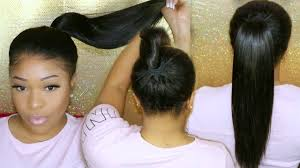
Step 3: Position The Wig
1)Place It on Your Head
Begin with the wig in your hand, holding the back part, and putting it upon your head. Adjust it back and front till it matches your natural hairline.
2)Secure With Combs and Straps
When in position, fasten it with the inbuilt combs and straps. Most wigs feature side combs and back combs as well as an elastic band to make a fit. This prevents the wig from slipping away without glue.
Step 4: Blend The Hairline
1)Melt The Lace Without Glue
Although it is glueless, you still want the lace to appear seamless. You may apply a small amount of mousse or spray on the edges and tie the front up with an elastic band to let it set in 5-10 minutes. This aids the lace to lie flat on your body.
2)Conceal The Lace
Use a small brush and place some foundation or powder along the parting and the lace part. The most natural mix is a shade that blends with your skin color.
Step 5: Style The Wig
1)Part And Define
Choose where you would place your part -middle, side or none. Strauss the part with a hot comb or flat iron (on a medium or low setting, depending on whether the wig is synthetic) and flatten the top of the hair.
2)Add Curls or Volume
Your wig can be styled the way your natural hair is. Twist it, mount it, or layer it. In the case of synthetic wigs, make sure that they can withstand any hot tools, and apply them first.
Step 6: Final Touches
1)Check The Fit
Check yourself in the window and move your head to the right. Ensure that the wig fits well and appears natural at the hairline and ears.
2)Accessorise If You Want
Headbands, clips or scarves can all add some personality to your appearance. In glueless wigs, you can change style quickly without worrying that the glue will loosen.
Additional Hints for a Perfect Install.
3)Keep It Clean
Clean your wig as frequently as you can. This maintains its look fresh and prolongs its life.
Don’t Overtighten
Fit the straps. Too tight a wig may cause you to have a headache or break your hair beneath.
4)Store Properly
Set your wig on a mannequin head or the original package when not in use. This assists in holding its shape.
Common Mistakes To Avoid
Omitting hair preparations, Unbraided hair underneath a wig leaves bumps, and it appears unnatural.
Cutting the lace too short- never cut off a small bit of lace to mix.
Excessive application of product- mousse, sprays and powders should be applied sparsely so that they do not accumulate.
Not caring about the wig’s appearance – dirty or messy wigs lose their natural shine very fast.
Advantages Of DIY
Installing your glueless wig will save you money on the salon, but you can do it yourself and have complete control over your appearance. In addition, you can change styles as frequently as you please without having to make an appointment.
After a few practices, it will only take a few minutes. It will eventually form part of your routine beauty routine.
Final Thoughts
The process of wearing a glueless wig does not necessarily have to be that hard. With the correct preparation and just a few simple steps, you can get a natural, flawless appearance that does not require glue or adhesives.
Whether you are new to wigs or already a fan of this beauty, a glueless wig is something to consider. They are easy, cozy and user-friendly, the ideal solution to testing out the styles of a hairstyle and still staying safe with your natural hair.
Simple, use your favorite unit, follow these steps and have your new look at your side with confidence.
also read: How Leher Is Empowering Farmers with Next-Generation Drone Solutions