How to Install A 360 Wig to Create a Perfect Ponytail
A 360 wig could be your best mate in case you want a natural-looking ponytail that is slick and looks natural. As opposed to regular lace front wigs, a 360 lace wig has a lace completely wrapped around the entire perimeter, providing you with a realistic hairline on the front, sides, and back. That is, you can put your wig in the tail or in a bun and not have to fear revealing tracks.
The trick, though, is to install it correctly. A shoddy installation may spoil the appearance, and a dainty installation may cause your wig to pass unnoticed. We shall discuss the installation of the 360 lace frontal wig on the perfect ponytail step by step.
What are the reasons for using a 360 Wig on Ponytails?
The reason is 360 lace wigs are versatile in design. The lace in the outer border resembles your own natural hairline, and the middle consists of breathable tracks sewn into the cap.
The biggest advantage? You can go with high ponytails, buns, or even half-ups and half-downs without revealing that it is a wig. It is the best choice if you adore both changing your appearance and maintaining your natural appearance.
Step 1: Prep Your Natural Hair
Braid Or Slick It Back
The more you flatter your natural hair, the more your wig will fit. In case your hair is long, put it in cornrows. When it is short, just brush it down with gel or mousse.
Put on A Wig Cap
When your hair is in place, wrap a wig cap over it to cover your hair and to make it smooth. Select a cap of the same color as your scalp to create the most natural look under the lace.
Step 2: Prep The Wig
Adjust The Size
The 360 wigs also tend to be fitted with adjustable straps and combs. Loose or tighten them to a point where the wig is snug, but not too tight.
Trim The Lace
Put the wig on your head before installing it, and that is where your natural hairline begins. Take it out and trim the lace at the front and the back. Never cut in a straight line, but always cut in a zigzag, to finish naturally.
Step 3: Apply The Wig
Position The Wig
Tuck the wig behind your head and pull it forward. Hold it to fit the lace along your natural hairline.
Secure With Adhesive(optional)
To have a perfect ponytail, you will need additional security. Use a thin coat of lace glue or adhesive gel on your hairline. Wait till it is tacky, then softly push the lace down using a rat-tail comb. Do the same on the back side to secure the wig well.
You can skip this step if you already bought a glueless 360 wig from wig brand like Cynosure Hair..
Step 4: Melt The Lace
Tie It Down
Tie an elastic band or scarf around the edges after glueing and leave it for 10 -15 minutes. This dissolves the lace into your skin to a perfect hairline.
Blend With Makeup
Apply a small foundation or powder on the lace to make it similar to your skin. Especially when planning a high ponytail, this is an extra handy step to take to your wig back.
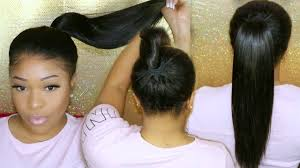
Step 5: Style Into A Ponytail
Brush It Smooth
Apply a paddle brush or a wide-tooth comb to untangle the wig and to smooth it back. Apply a little amount of mousse or gel to regulate flyaways.
Gather Into A Ponytail
Use wig hair like your natural hair and pull it into a ponytail. Ensure the back lace is flat and in place to achieve a high ponytail. To do a low ponytail, concentrate on flattening the sides.
Secure With An Elastic
Use a good elastic band to tie your ponytail. If you need additional polish, just wind a bit of hair around the band to conceal it.
Step 6: Perfect The Look
Lay The Baby Hairs
The majority of 360 wigs are already plucked with baby hairs. Apply edge control or mousse to shape them naturally along your forehead and at the nape. This move makes your ponytail look realistic.
Add Shine or Volume
Finish by spraying lightly with oil to make the ponytail shiny or teasing it to get it extra full. You can curl, wave, or leave it straight depending on the occasion.
Additional Advice to the Perfect Ponytail
Apply Got2b gel or lace spray to create a glueless appearance if you do not feel like being devoted to adhesive glue.
Don’t use too much product – over-application of gel or mousse will cause a build-up on the lace.
Look at the mirror in the rear before going out of the house. The hairline on the back must appear as natural as the front.
Practice is everything- initially, installing a ponytail will take longer, but it will become easier with time.
Common Mistakes to Avoid
- Failing to flatten your natural hair – bumps under the wig.
- Removing excessive lace – never cut away all of it: leave some to blend.
- Omitting the melting process – the lace will not look natural
(unless tied down).
- Drawing the ponytail too tight may raise the lace or harm the wig over time.
Caring For Your 360 Wig
To maintain the appearance of your wig to do further ponytails, one must take care of it.
- Wash every 7-10 washes using sulfate-free shampoo.
- Wash to make the strands soft and not tangled.
- Air dry it rather than high heat.
- Place on a mannequin head to keep the shape.
- Properly kept wigs are more attractive and have a longer life.
Why A 360 Wig Is Worth It
Although 360 wigs might be pricier than ordinary lace front wigs, the flexibility of 360 wigs is worth the investment. You can put them in various forms, high ponytail, bun styles and even down styles, without worrying about exposed tracks.
To anyone who loves to have fun with appearance without making it artificial, a 360 wig is a mandatory addition to your wardrobe.
Final Thoughts
One of the most well-known and multifunctional hairstyles, a sleek ponytail is now more attainable than ever with a 360 wig. Whether preparing your hair and making the lace cut, attaching the wig and arranging it, every part works with getting your perfect natural look.
The trick is time and practice. With the mastery of installation, you will be free to choose the ponytails, buns, and free-flowing styles without inconvenience.
If you have always wanted the ideal ponytail, a 360 wig is your desired product. The right install will have you driving with a natural appearance with people turning heads everywhere you go.
also read: How to Convert Blu-ray to MKV: Top 3 Tools You Should Know


